+

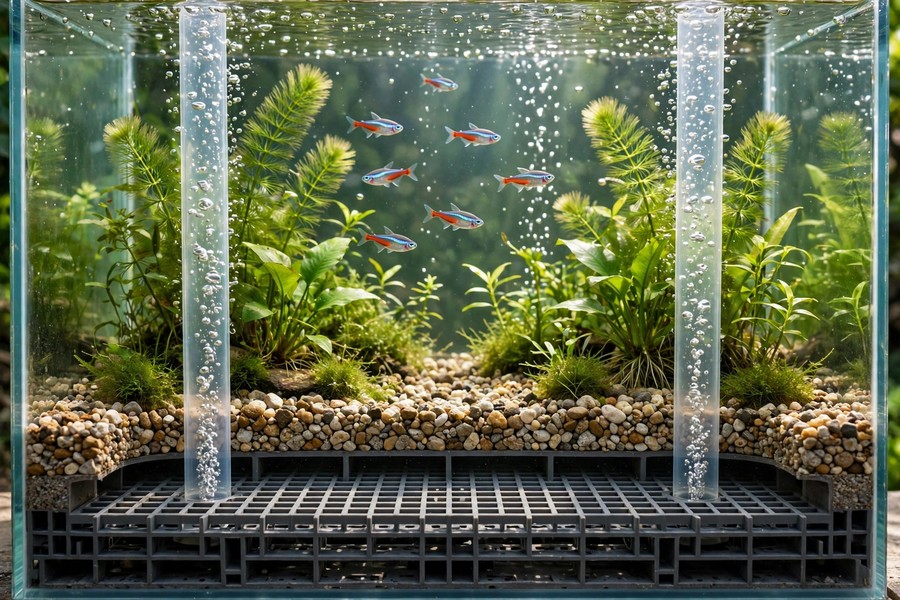
Undergravel filters are one of the oldest filtration methods in the hobby, and they never really went away. Once commonplace in fish rooms and shops, they lost ground to canisters and hang-on-backs — but they remain cheap, reliable, gentle on delicate livestock, and able to last the lifetime of a tank. Here is how they work, where they shine, and how to set one up.
Key takeaways
The system is simple: a grid of plates sits under a couple of inches of standard aquarium gravel, and uplift tubes draw water upward, much like a sponge filter does. Water is pulled downwards through the gravel first, which gives beneficial bacteria a surface area spanning the entire floor of the aquarium.
Debris, detritus and fish waste get trapped in the gravel, leaving the water crystal clear and free of toxic ammonia and nitrite. Because the flow is gentle, it is one of the safest filtration options for long-finned bettas, tiny fry and shrimp — no strong intake will pull them in.
The filter also runs on air, so a battery backup air pump can keep filtration going through a power outage of up to 40 hours. That resilience, plus low cost and easy hiding behind plants and hardscape, makes undergravel filters a favourite for large fish rooms and heavily stocked tanks.
It has long been rumoured that undergravel filters and planted aquariums do not mix, but in practice plants can thrive with one. The constant movement of oxygenated, nutrient-rich water through the roots can prevent root rot, improve nutrient access and build stronger root systems.
There is one placement catch: deep-rooted plants such as a large Amazon sword or dwarf aquarium lily may root firmly into the filter plates. Keep such plants in their long-term spots, or in areas with no plates underneath, so they are easier to remove and vacuum around later.
If you are weighing filter choices more broadly, our guide to how to tell if aquarium water flow is too strong helps you judge whether the gentle circulation of an undergravel system suits your livestock.
| Filter type | Substrate | Best for |
|---|---|---|
| Undergravel | Gravel ≥ 5 mm only | Fish rooms, fry, shrimp, bettas, budget setups |
| Sponge filter | Any | Fry and shrimp tanks, quarantine, backup filtration |
| Hang-on-back / canister | Sand, soil or gravel | Aquascapes with fine substrates and hidden equipment |
Gravel choice is wonderfully simple: it must average at least 5 mm so it sits on top of the grates without falling through. Decorative colour-coordinated gravel from a fish shop works, and so does an inexpensive bulk bag of pea gravel from a hardware store.
The more textured the gravel, the more surface area it offers beneficial bacteria. Aim for 1–2 inches of gravel across the whole plate area, and keep the depth even — water follows the path of least resistance, so thin patches get more flow than thick ones.
Each kit in the source guide contains 20 filter plates, each measuring 5.5 by 2.75 inches. Nine plates cover the bottom of a 10-gallon aquarium, so one kit can serve two 10-gallon tanks with one uplift tube each.
For larger tanks where you want full coverage, two kits are recommended. To size any tank, divide its length in inches by 5.5 and round down, divide its width by 2.75 and round down, then multiply the two numbers — that is the number of plates needed.
| Tank size | Plates needed (approx.) | Kits |
|---|---|---|
| 10 gallons | 9 plates | Half a kit (one kit serves two) |
| 20 gallons | Full floor coverage | One kit |
| 29 gallons and up | Full floor coverage | Two kits recommended |
Start with a clean, dry, bare-bottom aquarium and plan your layout first. You can leave some areas without plates if you intend to place large hardscape or deep-rooted plants there, since those spots will be hard to vacuum around.
Press the plates together from the top down using their dovetail joints, lengthwise or perpendicular, then assemble the uplift tubing. Tall tanks may need extension tubes, while short tanks may need tubes trimmed to fit — a shortened uplift tube can suit an aquarium with as little as 8 inches from bottom glass to waterline.
You will also need an air pump, airline tubing and a check valve, the last of which stops water siphoning out of the tank when the power goes off. Once running, maintenance is simply your normal gravel vacuum — and a tank that has been cycled patiently will let the bacterial bed in the gravel do the heavy lifting for years.
Old-fashioned does not mean outdated. For a simple, quiet, budget-friendly filter that hides completely under gravel and plants, an undergravel system paired with a natural CozyWoodLab driftwood scape is a combination that has worked for decades — and still works beautifully today.
Tip: never use sand or aquasoil over an undergravel filter. Fine particles fall through the grates, clog the plates and stop the flow that the whole system depends on — gravel of at least 5 mm is not a suggestion, it is the requirement.